2011 May 11

May 11, 2011 By The Blog Designer Network

WordPress is without a doubt an excellent platform to have not only a blog, but a website too.  It offers many “fancy” functionalities for website owners, and can be super simple for someone who just wants to start a blog!

There is a huge difference between WordPress.com (the free platform) and WordPress.org, your own self-hosted WordPress blog.  Simply put, having a blog on either Blogger or WordPress.com are close to the same thing.  You can see a comparison table between WordPress.org, WordPress.com, and Blogger at How Joyful Design Studio.

This will teach you how to set up your own self-hosted WordPress.org blog.

Buy a Domain Name: Your domain name is what people will type into their address bar to get to your site.  Ours is theblogdesignernetwork.com.  We also purchased blogdesignernetwork.com and thebdn.com, which both direct to the same place!  We suggest using GoDaddy.com for purchasing domain names, however many hosting providers (such as the sponsors in our sidebar) offer free domain names as an incentive for hosting.

Purchase Hosting: Unlike free blog platforms like Blogger or WordPress.com, you will need to purchase a hosting plan through a server of your choice.  This is like renting “space” for your blog on the web.  The prices vary from only $2 per month, up to $10.  We suggest RFE Hosting, Dreamhost, Bluehost, or Hostgator.  See our sidebar for their ads and possible discounts!

Link the Domain and Hosting account: If you purchased your domain name through your hosting provider, you can skip this step. You should get a welcome e-mail from your hosting provider.  In the e-mail it will identify your “nameservers” which may look something like this:

ns1.(hostname).com
ns2.(hostname).com

Example: ns1.rfehosting.com

ns2.rfehosting.com

Now log in to GoDaddy, or wherever you purchased your domain name from. For GoDaddy, click on “My Account” in the upper right hand corner. Find your domain name and click on the blue link to the right of your URL that says “Advanced Details.”

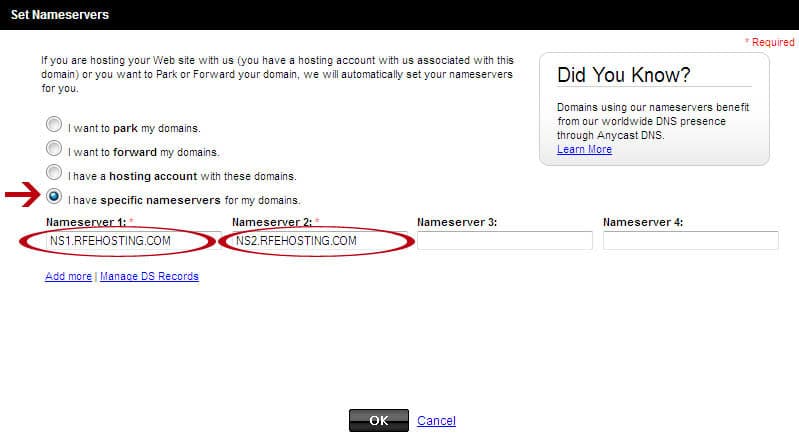
Then (see image below) click “Set Nameservers.”  For any other domain registrar, look for domain settings, then nameservers.
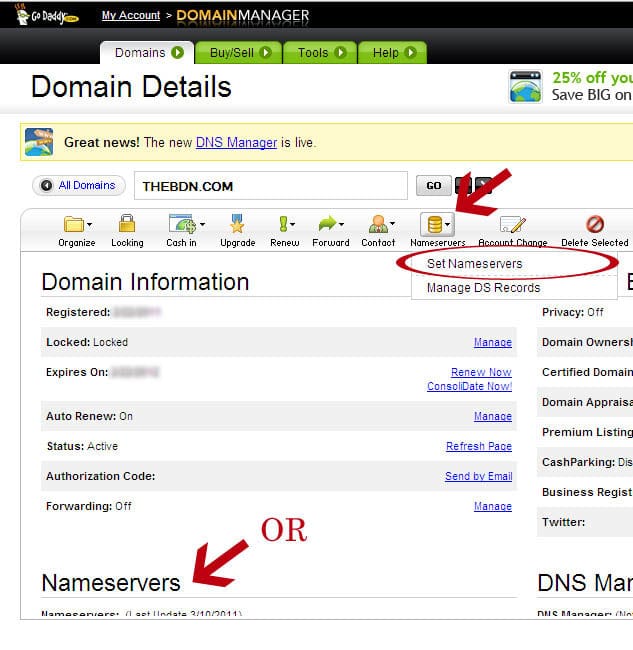
how-to-set-up-a-wordpress-blog-tutorial-3050937 A pop-up box will appear.  Insert your own nameservers and make sure the settings look like they do here.  Then click “Ok.”

how-to-set-up-a-wordpress-blog-tutorial-2-3772435

Important:  Your domain and hosting account may take up to 48 hours to complete this process.

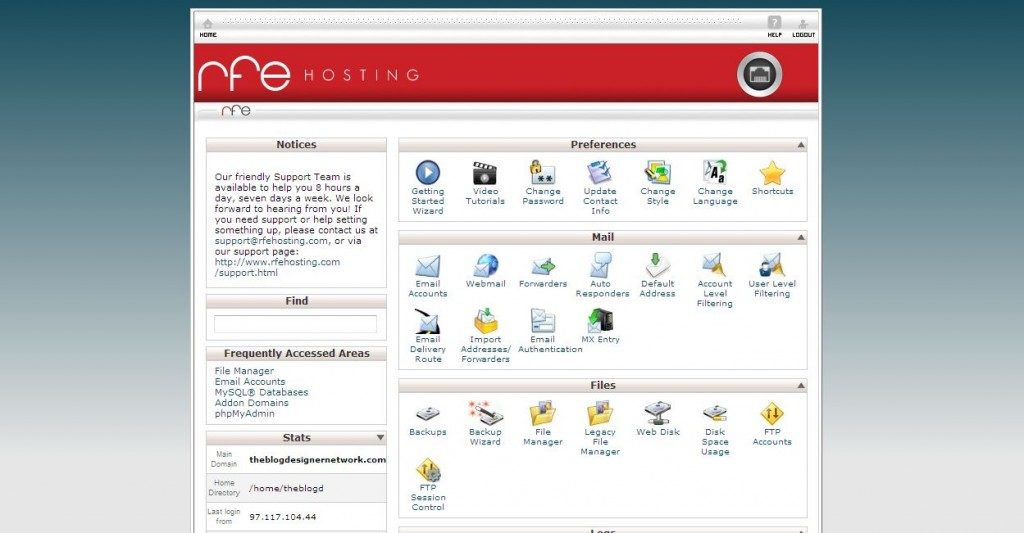
Install WordPress: Once you have purchased your domain name and set up your hosting account, you’ll need to install the WordPress software onto your account.  Your hosting provider will likely make this REALLY easy for you since WordPress is one of the most popular reasons people sign up for hosting.  For most hosting providers you will have access to what is called a “Cpanel” and it looks like this.  (Your hosting provider will customize it with their own logo.)
how-to-set-up-a-wordpress-blog-tutorial-3-1024x533-2029051

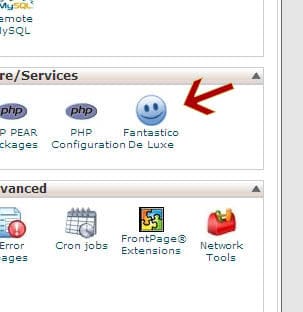
Then scroll down to the “Fantastico De Luxe.”
how-to-set-up-a-wordpress-blog-tutorial-4-9821455

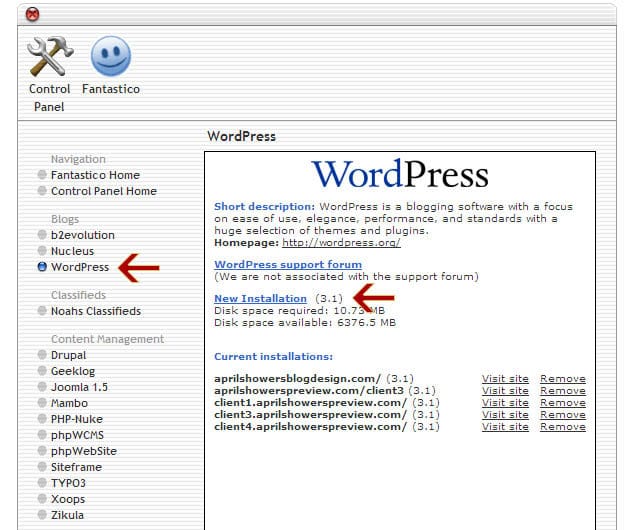
Select “WordPress” and “New Installation” as specified below.
how-to-set-up-a-wordpress-blog-tutorial-5-2755706

Fill out the information they request, and click “finish.”

In GoDaddy, simply Login and go to your Domain Manager.  Then click “Hosting Accounts” and find the “Launch” button next to your hosting account.  The “WordPress Install” link will be on that page.  Just click it, and it will guide you right through the process of installing WordPress!

Once WordPress is installed, go to:

yourdomain.com/wp-admin (Use your own URL.)

and

yourdomain.com/cpanel (Use your own URL.)

The first URL will take you to your WordPress dashboard where you can make posts, change your theme, and launch your blog!  Login using the username and password you set up during installation (not your hosting account username and password.)  The second URL will take you to your control panel, where you can set up e-mail accounts, make subdomains, manage your files (like header, background, etc…), and much more!

If you have any questions about this tutorial, visit our new forum and ask away!

May 11, 2011 By The Blog Designer Network

Here are the winners for the awesome giveaway! Congratulations you guys! Please e-mail us at [email protected] to claim your prizes!
WTF?

May 1, 2011 By The Blog Designer Network

Whether you’re a seasoned typography nerd, or just getting started in the biz – choosing fonts is one of the best aspects of design.  As you continue to tap into the fonts provided by Photoshop or Illustrator and search online for typography to download, a “sixth-sense” starts to emerge.  Suddenly every logo, every letter printed on a pizza box, number on your cell phone, ampersand on a billboard – piques your interest.  Eventually you’ll find yourself easily identifying said fonts.  Usually aloud.  To your significant other…your children…your eye-doctor when he asks you to read the “third line” from the top.

We’re going to call this the “font-dar.”  It’s like “radar” only more geeky.

Of course not all fonts faces can be easily memorized (but we can sure try), so it’s easy to see unfamiliar typography in familiar places!  But there’s an easy and awesome solution.

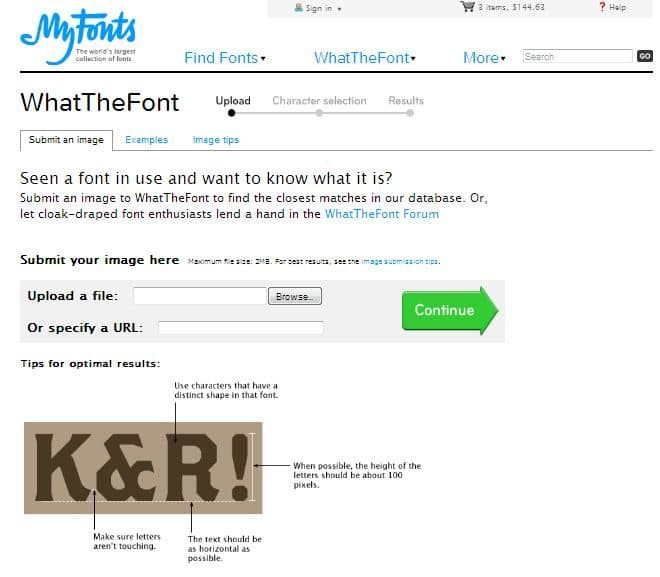
It’s called What the Font

wtfcapture-6302856 Simply upload the image of your font and identify the highlighted letter!

Found at a retail store on a lotion bottle.

april2011-024-764x1024-1098286

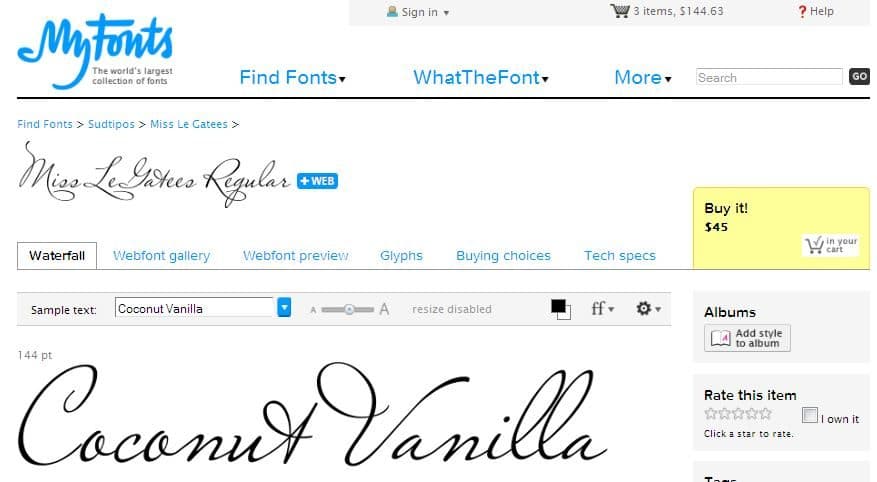
Font:  Miss Lee Gates

capturewtf-8623375

Found on a menu at a restaurant.

wtf2-300x107-8992468

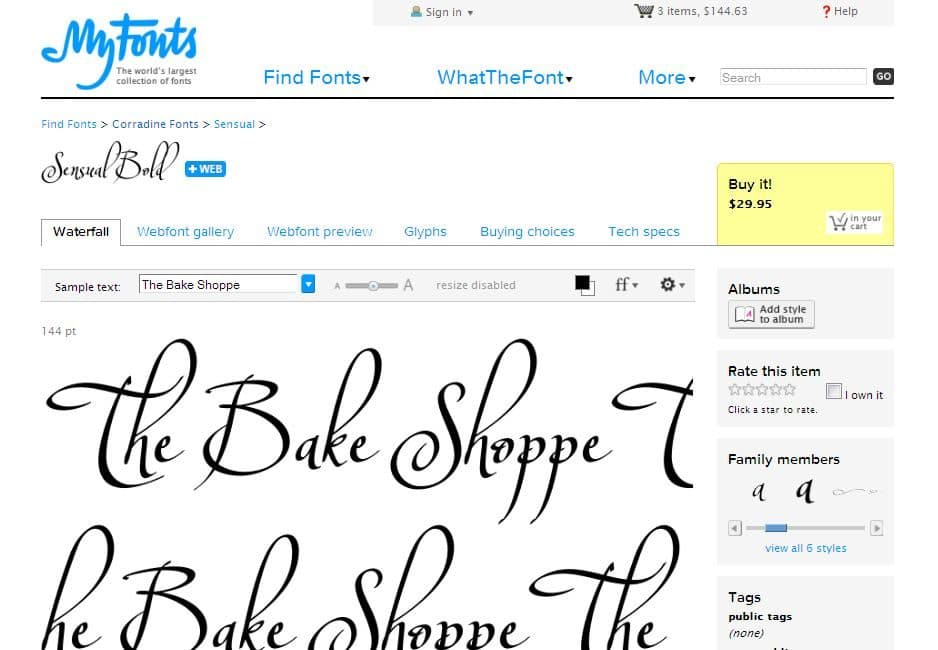
Font:  Sensual Bold

wtfcapture2-1137239

Pretty awesome huh?  Go try it!

Note:  The links to the above site are non-affiliate links and the BDN is not compensated for suggesting this site.  It’s simply awesome.

A Huge Giveaway and Announcement!

April 27, 2011 By The Blog Designer Network

Many of us know how amazing the site Beautiful Blog Designs is, and it may have even helped us as a blogger or designer a time or two!  We would like to announce that Beautiful Blog Designs and The Blog Designer Network will now be ONE amazing place!

That’s right – all the wonderful content that Amanda established at BBD will be relocated to this site- and after a transition period, everything from BBD will be redirected here.

In honor of our launch and “merger”, we are hosting a huge giveaway! This giveaway is great for bloggers, blog designers, and anyone who wants the AMAZING prizes below!

TO ENTER: Simply write a little post about The Blog Designer Network on your blog, and comment on this post with your link! That’s it! We are trying to get the word out about this awesome site, and would love the support! Feel free to grab one of our button graphics to include in your post.

button-1747804

button2-1159820

PRIZES

Registration to the May edition of The Blog Designer Workshop by The BDN 6 Months of Advertising on the Blog Designer Network by The BDN $25 Gift Certificate to Workshop(s) or Videos by The BDN

Custom Illustration by April Showers

Social Media Design Package by Laura Jane Designs
Genesis Theme Framework & Family Tree Child Theme by Mommy Monologues
$50 Blogger to WordPress Transfer (Genesis/Family Tree theme incl.) by Mommy Monologues
Vector Customizable Social Icons by Grey Bloom Designs
Basic Blog Layout by Custom Scrapbook Blog Designs
Genesis Theme Framework & Choice of Child Theme + Support by RFE Hosting
6 Months of Hosting by RFE Hosting
Domain Name Registration by RFE Hosting
Wufoo Membership by Zany Dezines
50% Off Any WordPress Package by Zany Dezines

TO ENTER (details):

REQUIRED:  To enter one time for all of the prizes, you must comment on this post and use the permalink to your published blog post about the Blog Designer Network.  The post must include a link to this site and mention a giveaway!

Specific Entries: If you’d like to only be considered for certain prizes, mention (with link) the sponsor of the item in your blog post and we’ll make sure to only enter you for the chosen items.

Additional Entries: To enter multiple times for certain prizes you can follow the prize sponsor in three different places. (Most of these links can be found on the sponsor’s website.)

–  Google Friend Connect.

–  Facebook.

–  Twitter.

For EACH new entry, comment on this post telling us you did so!  The giveaway will end on Sunday May 8th, 2011 12am MST.  Blog posts must be dated on or after 4/26/2011.

Add the Link Within Gadget

April 11, 2011 By Designer Blogs

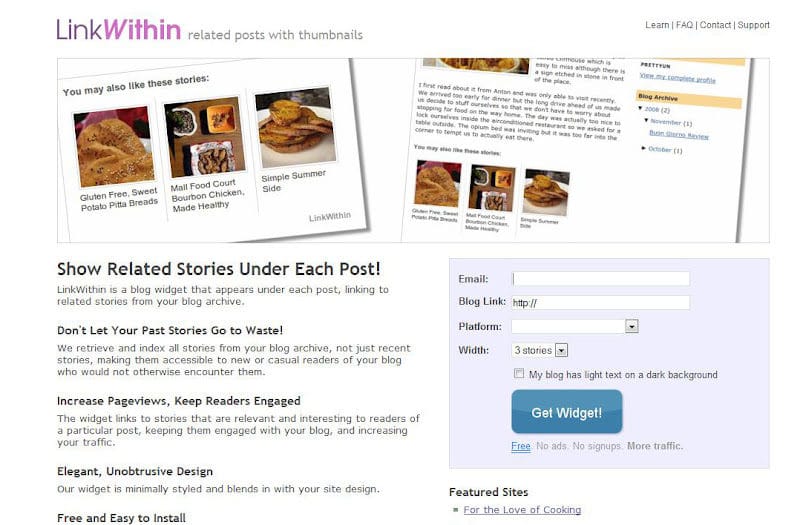
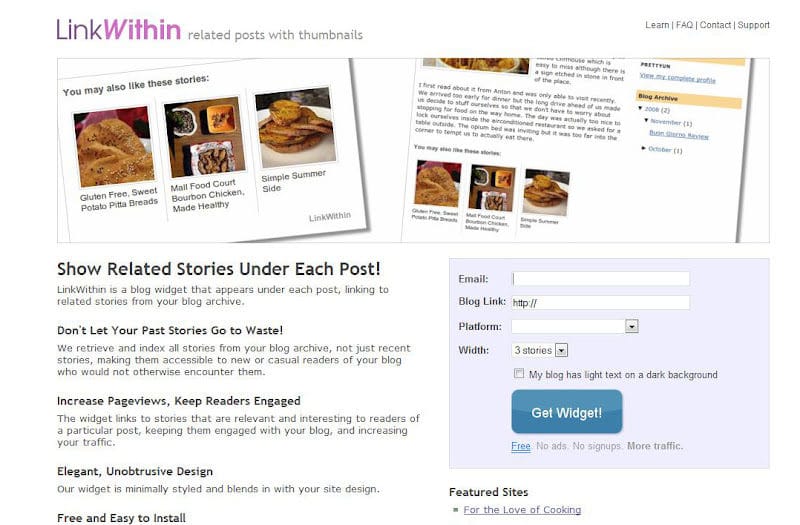
The “Link Within” gadget is a great way for your readers to read related posts. So let’s show you how to add it to YOUR blog!

Step 1:Start by vising the Link Within website. Found HERE.
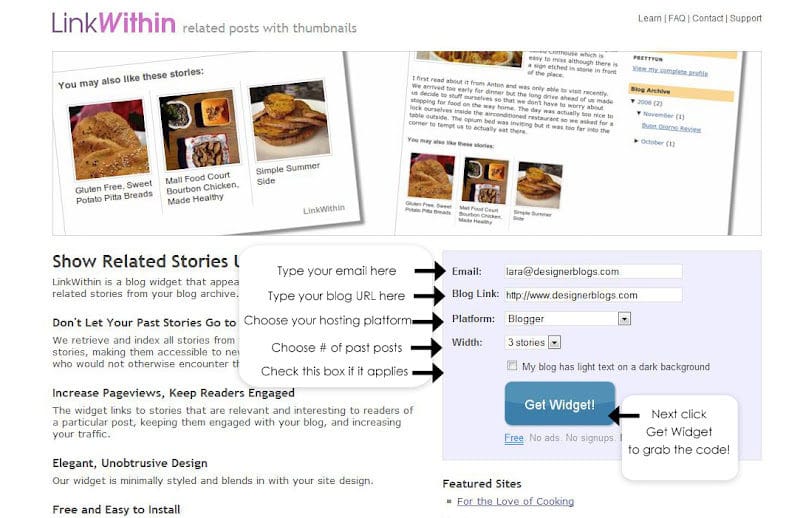
(this is what it will look like) lw1-9414487  

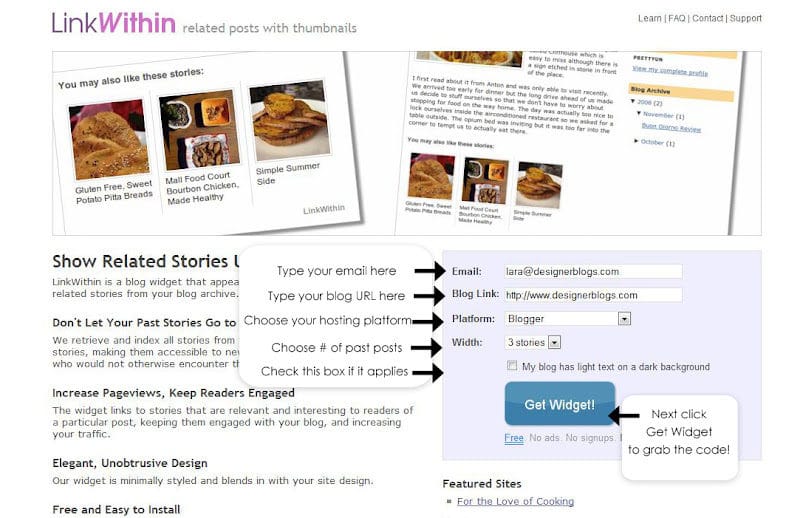
Step 2: You will then enter your information: lw2-3454656 Step 3: The website will take you to the last page.
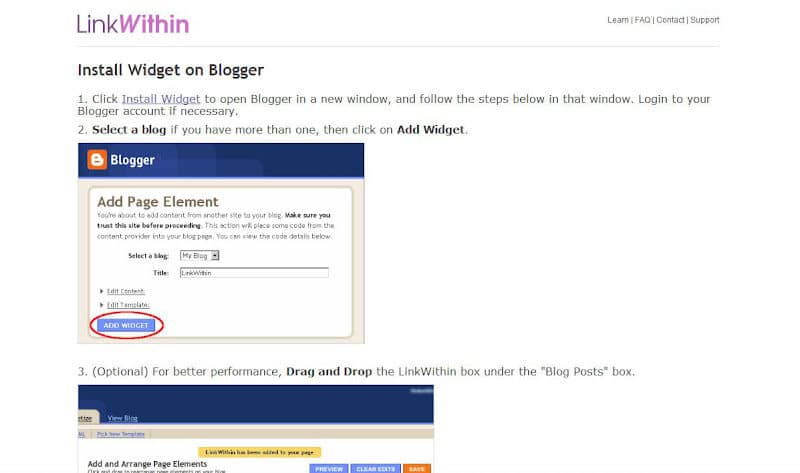
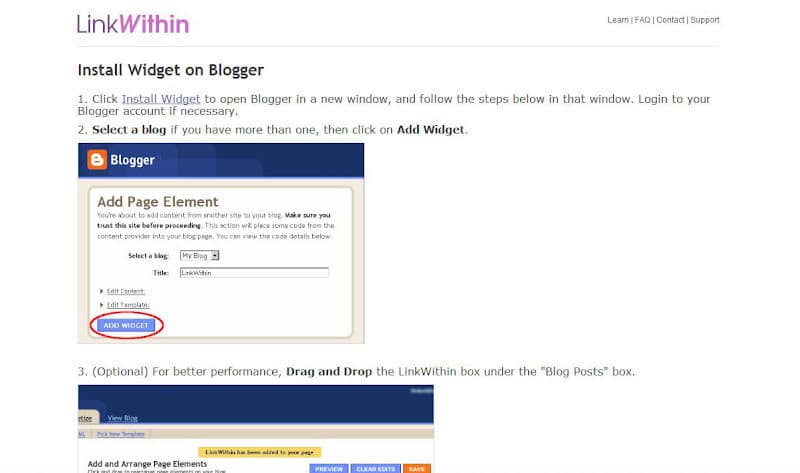
This page will explain how to install the widget to your blog.

lw3-1051070

And your finished! You now have past posts for your readers to enjoy!

db2-9617636

The Blog Designer Network Forum

I’m Sydney. I am a middle school teacher by day, blog designer by evening! I’m unmarried and I don’t have any kids yet, but I enjoy crafts, cooking, and, of course, blogging!

I’ve always loved to design, so I started up my own business last month. I was looking for a way to assist some friends in their adoption of a little girl named Olga.

I now do blog designs for Blogger and WordPress, but 100% of my profits go straight to an adoption fund. My goal is to do what I love by designing, and to raise money for an important cause!

I’m so excited about the BDN, and I look forward to connecting with other designers out there so that I can learn from the best as a blog design newbie!

Image Hosting Alternatives

April 13, 2011 By The Blog Designer Network

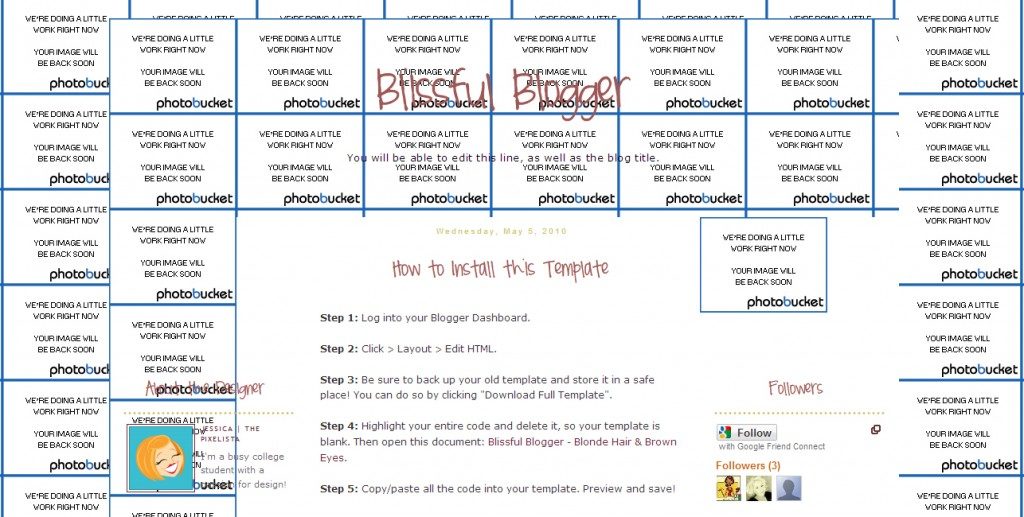
In the past few days, many bloggers and designers (mostly on the Blogger platform) have been affected by the “outage” at Photobucket that leaves many blogs looking something like this:

pboutage1-1024x517-5970193

Photobucket claims about 2% of users have been affected by this maintenance phase, which is lasting much longer than initially planned.  For a lot of designers, this means a  loss of business, a lot of angry clients, and a loss of confidence in a hugely integral part of their businesses.

It’s important to note that any similar website is not immune to such problems and will likely have outages, downtime, or other maintenance-centered issues.  Maintenance is a necessary process for any site, and thus far Photobucket has attempted to make this as painless as possible.

Jessica Barnard of The Pixelista said, “A blog is an intricate form of technology, and unfortunately there is no way to have absolute control over it: the reality is your blog probably rely on several different companies/products in order to function. And with any other form of technology, sometimes things malfunction. 10 or 20 years from now, Google and Blogger may not even exist, let alone Photobucket. For that reason, it’s vitally important that you back up your content. Just don’t throw the baby out with the bathwater!”

However, if you’re looking for an alternate way to host images for clients, here are a few options for you!

Use the client’s account: Many designers have a centralized location where they host ALL their client’s images (i.e. Photobucket, Flickr, etc…) Instead, have your clients sign up for their own account, and upload the images there instead. This way, if 2% of accounts are “out”, all your clients won’t be affected if you are part of that 2%.

Use your own server: If you’re familiar with WordPress, you know that all the images are actually hosted right on the blog or website. You don’t need a WordPress blog to host images, you just need a hosting account (see sidebar for recommended hosts). For example, if you use Dreamhost, you can login to your account, upload all the images, and paste in the URL of the image into the Blogger CSS just as you would with Photobucket “Direct Links”.   (URL Example: www.yoururl.com/folder/background.jpg)

Use the client’s Blogger blog: Another option is to upload all the images onto a back-dated post using the client’s Blogger blog. (If they don’t mind it appearing in their archive.) When you upload each image, Blogger gives it a “location” which you can find in the “Edit HTML” mode of the blog post. It might look something like this:

http://1.bp.blogspot.com/-l5WWazougFc/TZXzpSlhk9I/AAAAAAAAFNE/kNxFqC3vtr8/s400/YourImageName.JPG

Laura Jane of Laura Jane Designs stated, “After experiencing two major outages now with a paid Photobucket account, I’m changing the way I host and install images for customers. Each customer will be asked to host their own images through their own Photobucket, Picasa, or Tinypic account. Though I understand it puts your images out of your control, I feel that it’s the best option. The backlash from my account being down isn’t worth losing one image to a design stealer. It’s also a good idea to encourage all customers to back up every image and template should the graphics be lost to the internet.”

While no option is completely full-proof against outages or complications, you can protect yourself and your clients by having alternative means of image hosting!

How to Make a Drop Down Menu in Blogger

April 12, 2011 By The Blog Designer Network

Here is a simple, browser-friendly drop down menu bar that you can use in Blogger!

Step 1: Go to your Blogger blog and click “Design” then “Edit HTML.”  Backup your template and widgets!

Step 2: Click “CTRL + F” and paste this in the box:  ]]>

Step 3: Directly ABOVE the code you just found, paste all the following code.  (This styles your menu bar with background colors, text colors, borders, etc…)

.menu{
border: 2px solid black;
margin:0px;
padding:0px;
font: 67.5% “Century Gothic”, “Bitstream Vera Sans”, “Trebuchet Unicode MS”, “Lucida Grande”, Verdana, Helvetica, sans-serif;
font-size:15px;
font-weight:bold;
}
.menu ul{
background: pink;
height:35px;
list-style:none;
margin:0;
padding:0;
}
.menu li{
float:left;
padding:0px;
}
.menu li a{
background: pink;
color: black;
display:block;
font-weight: normal;
line-height:35px;
margin:0px;
padding:0px 25px;
text-align:center;
text-decoration:none;
}
.menu li a:hover, .menu ul li:hover a{
background: black;
color: lightblue;
text-decoration:none;
}
.menu li ul{
background: pink;
display: none;
height:auto;
padding:0px;
margin:0px;
border:0px;
position:absolute;
width:225px;
z-index:200;
/*top:1em;
/*left:0;*/
}
.menu li:hover ul{
display:block;

}
.menu li li {
background: ;
display:block;
float:none;
margin:0px;
padding:0px;
width:225px;
}
.menu li:hover li a{
background: ;

}
.menu li ul a{
display:block;
height:35px;
font-size:12px;
font-style:normal;
margin:0px;
padding:0px 10px 0px 15px;
text-align:left;
}
.menu li ul a:hover, .menu li ul li:hover a{
background: lightblue;
border: 0px solid black;
color: black;
text-decoration:none;
}
.menu p{
clear:left;
}

Click here for a guide on how to customize this section.

Step 4: Save your template.  Then click on the “Page Elements” link and add an “HTML/Javascript” widget. Copy and paste the following code into an HTML/Javascript Widget. (These are the names and links for your menu bar.)

  • Home
  • About Us
  • Recipes

    • Breakfast
    • Lunch
    • Dinner
    • Dessert

  • Photography

    • Babies
    • Families
    • Seniors

  • Crafts

    • Scrapbooking
    • Kids Crafts

  • Contact

Click here for a guide on how to customize this section.

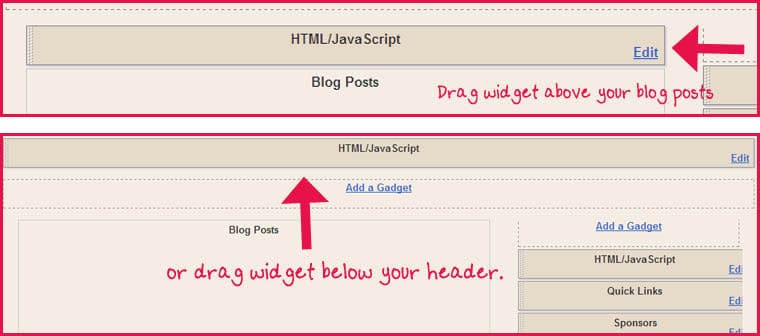
Step 5: Click and drag the widget to the area beneath your header, or alternately, the area above your blog posts.

dropdowntutorial3-9105952  

If you have any questions, simply leave a comment!  I would love to see it LIVE on your blog, so leave a comment with your URL!

2011 April 11

April 11, 2011 By Designer Blogs

The “Link Within” gadget is a great way for your readers to read related posts. So let’s show you how to add it to YOUR blog!

Step 1:Start by vising the Link Within website. Found HERE.
(this is what it will look like) lw1-6226659  

Step 2: You will then enter your information: lw2-7030095 Step 3: The website will take you to the last page.
This page will explain how to install the widget to your blog.

lw3-2653211

And your finished! You now have past posts for your readers to enjoy!

db2-3987455

April 11, 2011 By Chris

When deciding how I wanted  the second half of my career to go, first I needed to sit down and address the most glaring and obnoxious mistakes I’d been making. If I couldn’t identify what I was doing wrong, there was no point in trying to change. Since five is a nice, easy-to-manage number (because, seriously, I could have kept making a list for about a week…) I sat down and came up with this list of the most egregious mistakes I have been making as a business owner. Here they are, in no particular order:

Working without a contract

This is the cardinal mistake of freelance designers. I don’t know about you, but I hate confrontation. Going into a business arrangement expecting to need something that details how you’ll deal with things if they go wrong is never fun. You know what’s even less fun? Doing 18 hours of unpaid work because you never spelled out what the project actually is. Or doing “Just one more tiny change – it will only take 5 minutes” 52 times. Or doing 9/10’s of the work to have the client tell you they’ve brought another designer on. Or “picking your brain” and then taking your ideas to someone who underbid you to execute. A contract spells out the expectations both parties involved should have – protecting both parties. If, like me, this is something you just can’t seem to do, find and partner up with someone who will do it for you. A contract spells out exactly what services you are exchanging for the price. If you haven’t watched it yet, check out Mike Monteiro’s “F**k you. Pay me” presentation at Creative Mornings for even more insights about why you should never start work without a signed contract negotiated by both parties. Every single time I haven’t insisted on this, I have regeretted it (immensely, and often, immediately).

Thinking I could do everything

I have worn many hats in my 15 year career. Logo designer, information architect, copywriter, site builder, PHP coder, flash developer, project manager, IT, marketing, billing…unfortunately, I haven’t been good at them all. I’ve been downright terrible at some of them. And, when you’re juggling that many balls, it’s not surprising that you start dropping some. There have been times in my career where I’ve overestimated how much I can handle. This is bad for everyone involved – you don’t have time to be creative, clients are overpromised and underdelivered – you just can’t keep up. Either keep your business small enough to manage (which means taking on probably half of what you think you can mange creatively, so you can spend the other half billing and marketing and doing strategy) or get someone to help you out.

Undervaluing my expertise

I charged basically the same rates one year ago that I did when I started freelancing five years prior to that. I don’t know if I was scared of losing out on projects in a bad economy, or alienating existing customers, if I just didn’t believe in my skills, or I was afraid clients wouldn’t think I was worth my fee. Then, one day, my wife asked me “Are you the same designer you were five years ago?” When I answered “No, I’ve gotten better.” she shot back with “Then why are you charging clients the same price for a better designer?” She was right. Every year I put in untold hours learning new skills, keeping up with best practices, adding PHP or WordPress or jQuery or CSS3 to my toolbox… yet I kept charging like I didn’t know those things. I’ve also started to discover that if you don’t value your time and expertise, nobody else will. That also means saying no to spec work, not participating in crowdsourcing , and not charging prices that devalue your work.

Failing to plan

In 15 years of business, I had never had a plan. Not for where I wanted to go with my career, or how I was going to get to the nonexistent location. Most of the time I just kind of bounced around from one thing to another, looking for the magic job that would make me happy and fulfill all of my creative dreams (excuse my while I roll around laughing on the floor at this ridiculous goal). I tried this, got bored, tried that, tried this other thing. Is it any wonder that I haven’t gotten anywhere? I never even decided where I wanted to go! Another saying I’ve been thinking about lately is “Those that fail to plan plan to fail”. With no plan, how could I ever hope to succeed? My partner and I have sat down and figured out both short term and long term goals. Right now, I have a list of 5 concrete goals (both business and life) on my white board. Every day I look at them and ask myself what I’m doing to get closer to those goals. And you know what? For the first time in five years I actually feel like I know what I’m supposed to be doing to get to where I want to be. Imagine that!

Forgetting why I do this

Probably the biggest mistake I’ve ever made is forgetting why I do all of this. Sometimes, in the day-to-day grind of being a creative professional, you forget that it’s not just about the professional. When I was a young, eager, starry-eyed designer, I would stay up for days lost in code, brain as furiously smoking, reading every book I could on Stefan Sagmeister, Neville Brody and David Carson. I would go to conferences and stalk Amy Franceschini and Josh Davis and Jeffrey Zeldman. I would consume and live and breathe that moment when you had solved a problem simply, elegantly and beautifully. I let the daily grind of contracts and getting paid and giving in to client demands and generally just becoming a “HEY YOU KIDS! GET OFF MY LAWN!” cranky old fart designers who used to bitch about having to use a computer instead of press-on type and a waxer and sketch with a pencil and a gee-dee notebook the way Paul Rand intended that I used to roll my eyes at and think “Move out of the way, dinosaur” while I was in school that I lost sight of the reason I started in this business, anyway. The whole reason I got into this was love – that and I don’t know what I’d do with myself if I didn’t do this. It’s all about the love. When it isn’t, it just isn’t worth it any more.

I’m still faaaaaar from perfect (ask anyone!)

Regardless of all of my observations and Life 2.0 navel-gazing, I still have a long way to go to get over these mistakes I’ve made. I’m sure I’ll not only keep making some of the above errors, but will come up with some brand new ones! The key, though, is to be aware that you’re always going to be making mistakes (if you’re not, you’ve stopped trying to learn and grow)…just learn from them, and continue striving to be better.

I’d love to hear what your biggest challenges are as a designer. What are some of your biggest business mistakes as a designer, and what have (or are) you doing to correct them?

The Pixelista

April 3, 2011 By The Blog Designer Network

square-button-8357482 Are you bored to tears by your bland, generic blog template? Need a website that is vibrant and inviting?
The Pixelista offers design solutions that won’t empty your wallet. If you’re looking for a web professional with creativity and passion for your project, The Pixelista is the right choice for you!

brand identity

April 3, 2011 By The Blog Designer Network

square-button-7067023 Are you bored to tears by your bland, generic blog template? Need a website that is vibrant and inviting?
The Pixelista offers design solutions that won’t empty your wallet. If you’re looking for a web professional with creativity and passion for your project, The Pixelista is the right choice for you!

April 3, 2011 By The Blog Designer Network

deluxedesignsbutton-5914963 Deluxe Designs specializes in blog and graphic design. We design personal and professional blogs including craft, mommy, photography, small business, and fashion blogs, but certainly do not limit ourselves to these. Using the Blogger platform, we provide user-friendly and finished looking design templates and work with you from beginning to end. Visit us to learn about other services such as Facebook welcome pages, logo design, Etsy, business branding and more. We love clean and elegant styles!