5 Steps to a More Beautiful Blog

December 18, 2009 By The Blog Designer Network

Okay, I hope this comes as an intervention for some bloggers, but please know that I write this post with love.

I visit a LOT of blogs in the “Blogosphere” to find new designers and “beautiful blogs” to feature. More often than not I find blogs that have fallen prey to many design pitfalls. So, I am going to list a few steps you can take to spiffy up your blog so that more readers stick around.

  1. Center up the buttons on your sidebars, please. It is so easy to do and it will make your blog look so much better.
    • Simply go to the gadget with that HTML code for the button and add < center > to the beginning of it and < / center >to the end of it. (Take out the spaces I added so that this post wouldn’t be centered.)
    • If you don’t like any to be centered, rather left-justified then go into the gadgets with the button that is centered and take out the the < center > and < / center > that was added to the HTML by the creator of the button.
  2. Get a free, premade or custom design for your site. It hurts my heart when I go to someone’s blog and they still have the generic Blogger template up. There are too many options out there to not give your blog a face lift. You need help with that, please leave me a comment and I’ll walk you through it.
    • You don’t have to get a fancy or elaborate blog template, just getting a custom header will bring a boring blog to life. See the Mulberry Spot to see what I mean. Or, customize your header font like I did at Hollywood Photography (my long forgotten photography blog).
  3. Make a link list post for the hundreds of sites you have linked on your blog’s sidebar. This is so easy and will really tidy up your sidebar so much!
    • To do this simply create a post called “Links” or “Friends” or “Places I Go” or whatever you want to call it. Then copy all the links into that one post.
    • After you have the post created, add a list or link list gadget to your sidebar. Title is whatever you decided on for the post title. Then add the URL address of that post to the link.
      • An example of this is at my personal blog, Moving Forward. I have a “Categories” list that links to one post or several posts.
  4. Make the font on your blog one that is easy to read, both in style and size. I have stopped by some blogs that had the font so small that I couldn’t hardly read it.
    • Another step in making your posts easy to read is to add paragraph breaks. If I stop by a blog and they have a post that is one long paragraph, I click right on out. Break up what you are writing about into several small paragraphs.
      • If you try to add  paragraph breaks but they don’t “stick” then go into the HTML code part of your post and add < p > or < br > where you want the breaks. (Take out the spaces I have added.)
  5. Clear out some of the ads you have on your site. Some blogs have so many ads, both on the sidebars and in between posts that it is hard to see where the actual posts are. Very distracting, very busy.

Here are some posts by other bloggers, about what to do or not to do concerning your blog.

Ten Blogging Mistakes by Darcy at My 3 Boybarians
Blog Design: Keep it Clutter-Free and User Friendly by Melanie at Blogging Basics 101
Basic Blog Design Principles by Karla at Modern Media Mom
CSS/HTML

December 16, 2011 By The Blog Designer Network font5-150x150-7935716

It’s easy to implement custom fonts onto your blog or website!  This tutorial is for both Blogger and WordPress, and will teach you how to choose a custom font for various areas of your site using the free Google Web Font repository.  For a larger selection, you can also try a Typekit membership.  You can […]

November 22, 2011 By The Blog Designer Network

bdncssspritetutorial-150x66-9818428

Many designers use various techniques for linking images on a website, and making those images change upon hover. From image maps, to slicing each image individually – the page load time and usability of these techniques aren’t as optimal as using CSS image sprites.  Here is a quick way to create a functional and user-friendly […]

October 10, 2011 By The Blog Designer Network

capturepagestut1-150x150-2016447

In Blogger you can easily add a menu bar underneath the header area to display your pages.  However, usually the menu bar does not come formatted and looks unsightly on blogs that have been customized.  Here is a quick and easy way to format this menu! Design your page to your specifications, then go to […]

April 12, 2011 By The Blog Designer Network

NOTE:  This is for the MINIMA TEMPLATE ONLY and does not work on the new Blogger interface.  An update will follow soon.   Here is a simple, browser-friendly drop down menu bar that you can use in Blogger! FIRST, click here to see the preview of the menu bar you will be installing. You will […]

April

January 23, 2012 By April

We’re so excited to launch more classes than ever this February!  From newbie design classes in Photoshop Elements, to advanced PHP coding in WordPress.  Check out the entire list of courses via the catalog. Next, we also want to announce that we are having a Twitter party TONIGHT using the hashtag #BDNparty.  It will last […]

January 2, 2012 By April

If you’ve been curious about design and taking the plunge into starting your own business, this week begins the next installment of the Blog Designer Workshop.  Click here for more information and to register.  This workshop is great for both intermediate and novice designers and coders, and covers Blogger coding, WordPress coding, and design in […]

April 3, 2011 By April

Hover over this image to see an example of the effect you can do with this code! Using the code below, paste in your own URL, the URL of your default image, the URL of your hover image, and the alternate text to display. Be sure to keep the ‘ on either side of your […]

Using The “Next Blog” Feature In Blogger Just Got More Relevant

January 9, 2010 By Amanda Padgett

Guest post by Dawn Farias

I have a confession to make: I LOVE the Blogger navbar.  I love it for my own blog because it is easy to get into my dashboard from it.  I love it on other people’s blogs because of the search box right up top.  (Even if it’s not a very powerful search engine.)  And I LOVE being able to just click ‘follow’ to add someone’s blog to my list.  Yes, my world is thrown for a bit of a loopty-loop when it is missing from a Blogger blog.

But enough of all that.  I really only brought you all here together today to tell a small bit of news about ye olde Blogger navbar.  And I shall tell you in words straight from the official blog of Blogger: Blogger Buzz.

Some of you must have wondered what the Next Blog link on the NavBar does, and clicked on the link once or twice. Next Blog used to take you to a random blog, written by a random blogger. Your fellow blogger could have been writing her blog in a language that you don’t know how to read. Or you might be someone who likes to read about food and restaurants in Germany, but your randomly chosen next blog could have been focused on sports, and written in Tagalog.

We’ve made the Next Blog link more useful, by taking you to a blog that you might like. The new and improved Next Blog link will now take you to a blog with similar content, in a language that you understand. If you are reading a Spanish blog about food, the Next Blog link will likely take you to another blog about food. In Spanish!

Try it! It works!  Just go to your favorite Blogger blog and click “Next Blog” from way up at the top of the screen where the navbar is.  See if you don’t get redirected to a new favorite blog.

Well, you know, if the navbar is still there and all.  😉

Dawn Farias posts free Blogger layouts at Almost Ready Blogs.  She also blogs personally, as well as personably, at No Heavy Lifting.

Sharing a Blogger Blog Gets Easier

October 10, 2009 By Amanda Padgett

The folks at Blogger are really stepping up to the plate and making Blogger blogs even easier and more user friendly. I know that Word Press blogs are all the rage, but honestly I have had a harder time understanding it and am reluctant to switch over. Anyway, I found out about a new feature Blogger came out with and I have been meaning to share it for weeks.

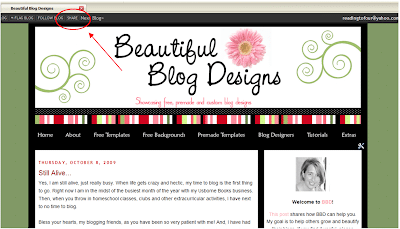
At the top of your Blogger blog, there is a navigation bar that “Search Blog, Flag Blog, Follow Blog and Share.” “Share” is the new feature I am “sharing” with you today.

Okay, first, below is a screen print of BBD, with the “Share” button circled and an arrow pointing to it. I do this so that everyone can see plainly what the heck I am talking about.

bbdscreen_sharetipwithcircle-4745132

(Click on image to make it larger)

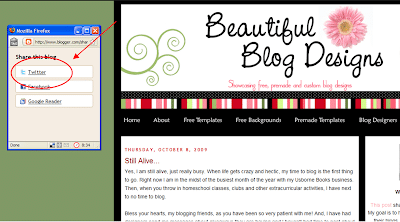
If you click on that Share button, a little box will pop up and you can click on how you would like to share the blog you are visiting. The options are Twitter, Facebook and Google Reader. I like the Twitter option best, so that is what I am going to use for the tutorial. Below is a screen print of BBD and the Share box that pops up.

sharebox-3144734

(Click on image to make it larger)

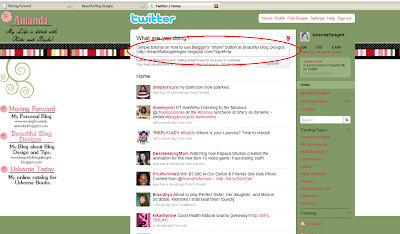
So, now I am going to go share this post on Twitter so you can see how it works. The screen print below shows a screen print of my Twitter page. I added the “Simple tutorial on how to use Blogger’s “share” button at…” the rest was what popped up when I clicked on Twitter in the share box. sharetipontwitter-1696112

(Click on image to make it larger)

There are many times that I when I am blog hopping and I come across a really useful or funny post and I want to share it on Twitter. Before I used Bitly.com (LOVE that program and will share about it another time) but now I can just click on the Share option in the Blogger navigation bar and presto!

Hope this tutorial helps a few of you. Hey, maybe you can even “share” BBD on Twitter for me. That would be awesome! If you do, please @amandapadgett so I can see your tweet and share the love back for you too!

Now, I realize that it does squat for the WordPress users, and I promise I am going to try to figure out that platform so I can be of some use to you, I just have so little time for blogging lately that it will have to wait a while longer.

Tutorial On How To Use Blogger’s New “Read More” Function

October 16, 2009 By Amanda Padgett

A Guest Post by Dawn Farias

FIT MORE POSTS ON A PAGE!

INCREASE YOUR PAGE VIEWS!

LET YOUR FIRST PARAGRAPH STAND OUT!

INCREASE THE RATE OF SHARING ON YOUR POSTS!

What do you think of that “Read more” link you just clicked?  Snazzy, eh?  This tutorial will show you how you can do that trick easily with Blogger’s new editor.  According to this article on displaying partial posts at Blogussion, it may just help you achieve those lofty goals above.  Let’s get started.

Switching over to Blogger’s new editor

The editor is where you compose and edit your posts.  The “Read more” function is easily accessible in the new editor, but you may not have switched over yet.  Let’s do that now.

After logging into your Blogger account, you will be taken to your dashboard.  Click on “Settings”.

Scroll all the way down to the bottom of the next screen.  This will be the screen for the “basic” tab.  Under “global settings” you have the option to “select post editor”.  You want to click “updated editor” and then “save settings”.  This change will apply to any other blogs you have.

Write your post

Scroll back up to the top and click on the “posting” tab to go to a new post.  Type your post and keep in mind that your first paragraph will be the only thing your readers see before deciding whether to click “Read more” or not.  Have fun, be creative, and try to capture their interest.

Insert the jump break

The jump break is the spot where you want to break your post up.  In this post that you are reading now, I wanted to insert the jump break after the exclamations in the intro.  Here is how I did that:  I scrolled to the top of the article and placed my cursor in the empty space between the intro and the next paragraph.


Next, I inserted the jump break by clicking on the torn paper icon in the upper right.  This will insert a gray line showing you where your post will be broken up.

That’s it! Publish, view, and enjoy.

Bonus Mini Tutorial:  Customize the words “Read more”

After viewing your post click Customize > Edit button on the bottom right corner of the Blog Posts widget.  (If not viewing your post, click Layout > Page Elements > Edit button on the bottom right corner of the Blog Posts widget.)

Betcha never noticed that button there before, huh?  Lots of cool stuff in that pop-up window.  For our purposes right now, though, look at the top.  Just click inside that box and the words “Read more >>” will disappear and you can enter whatever you like.  Take a moment, also, to look at the rest of the white boxes in this image.  You can edit the text in any of those and further personalize your blog and make it All You.

Troubleshooting:

  When viewing the “Read more” function at work you must View Blog and not View Post.  Viewing post will show you the entire length of your article.

If you’re using a heavily customized template then you may need to insert some code in order for this function to work properly.  See this post at Blogger Buster for help on adding the read more function to customized templates.   For example, in this tutorial I’ve manually inserted the Read more link at the top which is why it didn’t disappear when you clicked through to read the entire thing.  But I’m a mere humble guest blogger and don’t have access (nor permission!) to go rummaging around Amanda’s code to fix things.

UPDATE:  Please see this post at Blogger Stop for solutions to three common errors you might get with the “Read more” function.  The last two errors I’ve encountered while doing this tutorial!

P.S.  In honor of this tutorial I inserted jump breaks all over the posts that appear on the front page of my personal blog.  It was a lot of fun and I now feel very professional.

——————————————————————————————

Dawn Farias has a personal blog at I Hate Socks where she bemoans her sock laundering duties and asks important questions about being Catholic, choosing homeschooling (over and over again with the dawn of each new day), and how to live a more holy life.  If that stuff doesn’t interest you then maybe you’d like to check out her brand new blog decorating shop, Almost Ready Blogs.  She’s dying for feedback over there and promises not to wax theological.  😉

Tutorials Recently Added

July 31, 2009 By Amanda Padgett

In my continual effort to learn more about blogging and how to work with my own blog template, I am always in search for good, relevant tutorials. Here are some that I found (and added to the Tutorials page) over the last couple of weeks that I either used myself or thought would benefit those stopping by here.

~~~~~~~~~~~~~~~~~~~~~~~~~~~~~~~~~~~~~~~~~~

Would you like to enter to win a free custom blog design? Head over the the Giveaways page to see which designers are doing giveaways and where to enter.

Introducing “Dear BDN”: An Anonymous Advice Column!

June 26, 2012 By The Blog Designer Network

Are you a designer or blogger that has come across a major dilemma either in the blog world, or in a working relationship?  Would you like advice on a specific issue, or possibly honest feedback on a design style you’re trying to implement?  Submit your quandaries anonymously via this form and we will post them here, on Twitter, in our sidebar, and other places for readers to see! (Again, it’s completely anonymous!)

The BDN will answer your question, and commenting for others will be open as well. Submit your questions below.

WordPress

December 16, 2011 By The Blog Designer Network font5-150x150-4614017

It’s easy to implement custom fonts onto your blog or website!  This tutorial is for both Blogger and WordPress, and will teach you how to choose a custom font for various areas of your site using the free Google Web Font repository.  For a larger selection, you can also try a Typekit membership.  You can […]

May 11, 2011 By The Blog Designer Network

how-to-set-up-a-wordpress-blog-tutorial-3-150x150-2705164

WordPress is without a doubt an excellent platform to have not only a blog, but a website too.  It offers many “fancy” functionalities for website owners, and can be super simple for someone who just wants to start a blog! There is a huge difference between WordPress.com (the free platform) and WordPress.org, your own self-hosted […]

December 16, 2010 By Amanda Padgett

Have you ever come across a wonderful craft or recipe post with lots of instructions and you wanted to print it out or save it to your computer for later use? I used to use ‘print page’ or I selected the text and chose ‘print selection.’ Not long ago a reader at my photography and […]

November 14, 2010 By Amanda Padgett

Are you new to WordPress.org? Or, are you thinking about moving from Blogger, but aspects of WordPress (like plug-ins) intimidates you? Well, if you are anything like me, the word “plug-in” stresses you out. Before I started a WordPress.org blog, Everyday Elements, I would hear others talking about plug-ins and they seemed so complicated and […]

July 12, 2010 By Amanda Padgett

Posted by Dawn Farias OK, I admit it: the only things I know about Seth Godin are that he is bald and doesn’t have a horizontal header on his blog.  He has a vertical one.  Both points can be easily illustrated.  Observe: Actually, I should say that’s all I knew about Seth Godin until recently.  […]